
Commercial model rocket engines are compressed into the casing using hydraulic pressure. The home constructed engine is made by compressing the charge with blows from a wood or plastic mallet. This method uses impact to produce a large compressive force. This force is applied only for an instant rather than continuously but the impulse force can actually be much higher than could easily be applied hydraulically. The pressure generated in this way depends on the weight of the mallet, speed at which it is swung, distance the charge is compressed, and surface the mold rests on during loading. If the loading is done, for instance, on a counter top much of the energy will be absorbed by the counter. If loading is done on a concrete floor the mold itself will absorb some of the energy but a much higher portion of it will go into compressing the powder.
Since very high pressure impulses are produced with a mallet care must be used to not over compress the propellant. The case can be split even inside the mold body if excessive force is used.
A disadvantage of the impulse compression is that the energy absorbed is dissipated down through the charge. In other words, the top portion of powder is compressed much more than the powder deeper in the case. Because of this small portions are compacted at a time. Ten or more separated charges are separately placed in the case and compressed.
Rub a bar of soap allover the piercer for lubrication and then place a case in the mold and close the mold. The mold should not easily close completely. If the case is loose in the mold wrap enough extra layers of paper around the case so the mold lacks 1/16 inch of closing easily. Wrap an extra paper around the nozzle end of the case two or three wraps. This is where all the mold split cases originate and so this area needs to be extra tightly compressed in the mold. Tighten the wing nuts to close the mold. Remove the base.
Common pottery ceramic clay is used for the nozzle. The clay should be of the consistency used for sculpting. A block of prepared clay can be purchased at many arts and crafts stores. Keep the clay in an airtight bag or container. A five pound block would make about 325 nozzles for a 5/8 inch inside diameter rocket. Weigh the amount of clay needed for the nozzle as indicated in the dimension chart. Shape the clay around the base of the piercer small enough that the casing (in the mold body) can be slid down over the piercer, clay and spacer. The casing must fit tightly on the nozzle spacer and the spacer tightly on the piercer. If the spacer is loose on the piercer, it should not be used. If the casing fits loosely on the spacer, wrap cellophane tape around the spacer until the fit is snug. If the fits are not tight, the nozzle clay will be forced out and not enough will be left to form a good nozzle. Use the longest loading dowel to compress the clay until it does not compress any farther. Do not use the mallet--hand pressure only. Screw the base on securely.
Insert each of the two shorter loading dowels and let them slide down the piercer until they stop. Place a mark on the dowel even with the top of the case.
Use a funnel or make one from cardboard to aid in loading the powder charges. Be sure to use moist powder as described before. Weigh out each charge until you can estimate the quantity without weighing it. Pour in the first charge of powder, insert the longest loading dowel and compress the powder with fairly light mallet blows. Eight or ten blows should be given each charge. Load the remainder of the charges in the same manner. Slide on the next smaller loading dowel each time after a charge is compressed. When the line on that dowel is above the case, add the next charge and use that dowel to compress the charge and the following ones until the last dowel is used. When the top of the piercer has been covered by a compressed charge, use the dowel with no hole to compress the last charges. Before the piercer is covered, measure down from the top of the case to the top of the piercer and write down the measurement. Subtract the top loading thickness from this and compress charges until this dimension from the case top to the powder is achieved. The thickness of the top loading can be altered to provide a longer or shorter time delay as needed.
Weigh out the amount of clay for the top heading and lay it in on top of the powder charge. Wrap tape around the blank loading dowel so it fits snuggly into the casing and then compress the clay by tapping the dowel with the mallet several times. Remove the dowel. Poke the shank end of a twist drill bit down through the clay to the compressed powder. Remove it, turn it over and reinsert it in the hole. With your fingers, twist the bit until it just cuts into the powder. Set the engine aside to dry for several days or use a food dehydrator to speed the drying. The clay must have a chance to dry very completely or the hot exhaust gases can vaporize the remaining moisture in the clay and make the nozzle crack or crumble. If the clay heading is not compressed very tightly, it will shrink when dried and must then be removed and glued back in with glue around the outside of it.
After the clay has dried thoroughly make a white glue, or better yet, epoxy fillet all around the nozzle where it joins the case and similarly on the top heading. Allow this to dry completely.
Last, add the prescribed amount of smokeless gun powder on top of the clay heading. Tap the gun powder down into the hole in the clay. Glue a piece of paper down on top of this charge and again set aside the engine to dry. When it is dry, it is ready for use.
If you want to try a choked case instead of the clay nozzle replace the flat nozzle spacer with a half ball as described in the casing section. Wrap twine around the choked portion of the case until it is even with the outside. This will help support the tube and prevent it from being crushed during loading. Be sure the casing fits tightly as previously described. Loading is accomplished in the same manner. In place of the clay heading, a section of doweling with a hole drilled in it can be used. It must be firmly glued in place
preferably with epoxy. Another possibility would be to use several cardboard discs glued together to build up the proper height and with a hole drilled through it.
The old artificers used the rocket engines for sky rockets and merely attached them to a long stick for the proper balance and stability. After the propellant was loaded, the remaining casing was folded in over the top. (see Figure 3) The paper laminations were separated a few at a time by inserting a thin knife blade into the edge. The paper on the inside was folded down, tapped with a dowel and mallet, rotated and the next section folded down and compressed until the entire top had been folded down over the powder. The top layer was glued in place and then a few holes were made in the folded over casing down into the top powder charge. The holes were made with a sharp awl or drilled. A separate paper container was then attached to the top of the engine containing the expelling charge and fireworks display garnitures.
There are many variations possible in manufacturing the rocket engines. Instead of using a piercer, the core can be drilled out after the case is loaded. The clay nozzle, however, should be formed with the orifice hole in it while the clay is wet so essentially a very short piercer must be used. When drilling the hole, care must be taken not to damage the nozzle. Also, the powder tends to adhere to the twist drill bit and plug it up. Much heat can be generated by drilling and this must be avoided at all costs to prevent ignition of the propellant. Because of this, drilling the core is much more hazardous and is not recommended. If drilling is attempted, the drill bit must be backed out frequently, unplugged and allowed to cool. Drilling should not be attempted on engines with an inside diameter greater than 3/8 inch (3/16 drill bit). The drilled engine core is cylindrical rather than conical so produces a different type of thrust curve depending on the depth of the core.
Different shapes and lengths of piercers, different nozzle diameters, different total engine lengths are all possible parameters to experiment with. Two stage piercers with the lower section larger in diameter with an abrupt change to a smaller diameter with different length proportions is another possibility for experimentation. This type core should give a high initial thrust followed by a lower sustaining thrust.
When experimenting with different configurations, be sure to ignite the engine first in a static test stand from at least twenty feet for inside diameters up to 5/8 inch and considerably farther away for larger engines in case they burst. Point the top and bottom of the engine away from you or any other people or property that could be damaged. If the nozzle or top clay heading should happen to not be secured sufficiently they could be blown out of the casing. Because of this, great care should be taken to roll tight cases and provide a large fillet of glue around the bottom of the nozzle and the top of the top clay heading. Always carry out experiments in seclusion without spectators.
Before using engines in model rockets, test several of the exact type in a static test stand to be sure that they will consistently work properly. It can be very heart breaking to watch many hours of work on a model rocket shattered into confetti when a poorly made engine bursts.
Any diameter engine--smaller, larger, or in between the sizes listed in the dimensions chart can be made. Also the lengths of the engines can be changed to any desired length as long as the nozzle diameter is changed according to the following formula:
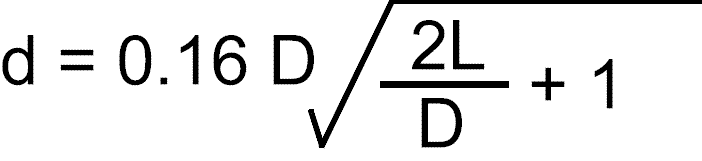
where d is the nozzle diameter, D is the inside case diameter and L is the length of the propellant core. Other dimensions are determined in terms of D as follows:
| Outside Case Diameter . . . . . . . . . . . . . . . . . . . . . . . . . . . | 1.5D | ||
| Piercer Tip Diameter . . . . . . . . . . . . . . . . . . . . . . . . . . . . . | 0.25D | ||
| Propellant Length Above Core . . . . . . . . . . . . . . . . . . . . . . | 0.375D | ||
| Top Heading Thickness . . . . . . . . . . . . . . . . . . . . . . . . . . . | 0.75D | ||
| Nozzle Thickness . . . . . . . . . . . . . . . . . . . . . . . . . . . . . . . . | 1.25D | ||
| Nozzle Spacer Thickness . . . . . . . . . . . . . . . . . . . . . . . . . . | 0.5D | ||
| Length Above Top Heading . . . . . . . . . . . . . . . . . . . . . . . . |
0.5D |
||
| Total Case Length . . . . . . . . . . . . . . . . . . . . . . . . . . . . . . . |
2.875D |
+ 0.875” |
Decreasing the core length without changing the orifice size will produce a longer thrust duration with a lower thrust. This effect, however, is not proportional because the higher the pressure is, the greater the burn rate is. The dimensions given are for the maximum thrust which will also give the shortest thrust duration. A longer thrust duration and lower thrust is more efficient and more desirable for lighter weight rockets.
The more the powder is compressed, the slower it will burn but the higher the total impulse will be. If the powder is not compressed sufficiently, the clay nozzle also will not be compressed sufficiently to withstand the pressure and it will be blown out.
To help hold the top clay charge in position, a hole 1/4 to 1/2 the I.D. in diameter can be drilled through the casing walls at the mid point of where the clay heading will be. When the clay is compressed, the clay will extrude out the holes and help anchor it in place.
| ◄ first page | ◄ previous page | next page ► | last page ► |